Windows 7 recovery is loading. How to use the command line to troubleshoot boot entry problems. From restore point
In this article, we will figure out how to restore the Windows 10 or Windows 8.1 bootloader on a computer running in . Damage to the Windows 8 boot loader can be caused by installing a second OS (Dual Boot configurations), incorrect actions of a “specialist” when restoring the system after a failure, deleting “extra” data on hidden partitions, a ransomware virus, and a number of other reasons.
Boot error The boot configuration data for your PC is missing: EFI\Microsoft\Boot\BCD
Damage to the Windows 10/8.1 bootloader installed in UEFI mode may be indicated by the inability to boot the system and the appearance of a new blue “screen of death” with the error:
The boot configuration data for your PC is missing or contains errors.
File:\EFI\Microsoft\Boot\BCD
Error code: 0xc000000f
In the Russian version of Windows, the error may look like this:
Your computer needs repair
Boot configuration data for your PC is missing or incorrect
File:\EFI\Microsoft\Boot\BCD
Error code: 0xc000000f
All this may indicate damage or even complete deletion of the Windows 8 bootloader configuration - Boot Configuration Data (BCD). Restoring the BCD bootloader using one of the previously discussed methods ( , ) will not work: when you try to execute the bcdedit command, the system displays an error:
The boot configuration data store could not be found.
The requested system device cannot be found
The fact is that the BCD BCD boot loader configuration in Windows 10/8 installed in UEFI mode is stored on a separate hiddensection EFI(100 MB in size with the FAT32 file system), which the bcdedit utility does not see, and accordingly cannot manage the bootloader configuration on it.
Automatic Windows Boot Loader Repair
The automatic bootloader recovery procedure built into , as a rule, is powerless in such cases. But it's still worth a try:

Manually repairing the Windows boot loader using a boot disk
Let's move on to the procedure for restoring the Windows bootloader on a system with EFI.
So, to restore the boot loader (BCD) configuration, you need to boot from the original Windows 8 installation DVD (or recovery disc or) and open a command prompt window: by selecting System Restore -> Diagnostics -> Command Line(System Restore -> Troubleshoot->Command Prompt), or by pressing the key combination Shift+F10). 
Let's launch diskpart:
Let's display a list of disks in the system:
Let's select the disk on which your Windows is installed (if there is only one hard disk in the system, its index should be 0):
Let's display a list of partitions in the system:

In our example, you can see that the EFI partition (it can be determined by its size of 100 MB and the FAT32 file system) has an index of volume 1, and the boot partition with the installed Windows system (this can be either Windows 10 or Windows 8.1/8) has a volume 3 .
Let's assign an arbitrary drive letter to the hidden EFI partition:
assign letter M:
A line should appear indicating that the drive letter was successfully assigned to the EFI partition:
DiskPart successfully assigned the drive letter or mount point.
Finishing work with diskpart:
Let's go to the directory with the bootloader on the hidden partition
cd /d m:\efi\microsoft\boot\
In this case, m: is the drive letter assigned to the UEFI partition just above. If the \EFI\Microsoft\Boot\ directory is missing (The system cannot find the path specified error), try the following commands:
cd /d M:\ESD\Windows\EFI\Microsoft\Boot\
Let's recreate the boot sector on the boot partition:
bootrec/fixboot
Use the attrib command to remove the hidden, read-only, and system attributes from the BCD file:
attrib BCD -s -h -r
Let's delete the current BCD configuration file by renaming it (saving the old configuration as a backup):
Using the utility bcdboot.exe Let's recreate the BCD storage by copying the boot environment files from the system directory:
bcdboot C:\Windows /l en-us /s M: /f ALL
Where, C:\Windows– path to the directory with Windows 8 installed.
/f ALL– means that it is necessary to copy boot environment files, including files for computers with UEFI or BIOS (theoretical ability to boot on EFI and BIOS systems)
/l en-us— system locale type. The default is en-us - English (United States).
Advice. If you use a localized Russian version of Windows 10 / Windows 8, the command will be different:
bcdboot C:\Windows /L ru-ru /S M: /F ALL
Possible mistakes:
- BFSVC Error: Can't open the BCD template store. status – – check the correctness of the entered command and whether you are using localized Windows, in this case you need to correctly specify the system language code (local language code)
- BFSVC Error: Error copying boot files Last Error = 0x570 – try checking the disk using CHKDSK M: /F
Run the commands:
bootrec /scanos
bootrec /rebuildbcd
All that remains is to restart the computer, after which the Windows Boot Manager item should appear in the selection of boot devices, in which you can select to boot the desired OS. BCD boot loader configuration successfully restored!
For many years, Microsoft has been improving the recovery system for the Windows operating system, and in Windows 7 and Windows Vista it works almost automatically. If you boot from the Windows 7 installation disc and click " System Restore" ("Repair Computer"), the Windows recovery system will launch and will independently try to fix all the errors that it finds. It can fix a large number of problems, however, it is quite likely that the bootloader is damaged, and the recovery system cannot cope with this problem. In this case You can restore the bootloader manually using the Bootrec.exe utility.
The Bootrec.exe application is used to fix errors associated with bootloader corruption and, as a result, the inability to start the Windows 7 and Windows Vista operating systems.
Sequencing
Description of keys for launching the Bootrec.exe utility
Bootrec.exe /FixMbrLaunched with the /FixMbr switch, the utility writes a Windows 7 and Windows Vista-compatible Master Boot Record (MBR) to the system partition. Use this option to resolve problems with the master boot record being corrupted, or if you wish to remove non-standard code from it. In this case, the existing partition table is not overwritten.
Bootrec.exe /FixBoot
Launched with the /FixBoot key, the utility writes a new boot sector compatible with Windows 7 and Windows Vista to the system partition. This option should be used in the following cases:
- The Windows Vista or Windows 7 boot sector has been replaced with a non-standard boot sector.
- The boot sector is damaged.
- A previous version of the Windows operating system was installed after installing Windows Vista or Windows 7. For example, if Windows XP was installed, NTLDR (Windows NT Loader, Windows NT loader) will be used, the code of the standard NT 6 loader (Bootmgr) will be overwritten by the Windows XP installer .
It should be noted that a similar effect can be achieved using the bootsect.exe utility, also located on the Windows 7 bootable media. To do this, you need to run bootsect.exe with the following parameters:
Bootsect /NT60 SYS
The boot sector of the system partition will be overwritten with BOOTMGR compatible code. You can learn more about using the bootsect.exe utility by running it with the parameter /help.
Bootrec.exe /ScanOs
Launched with the /ScanOs key, the utility scans all disks for installed Windows Vista and Windows 7 operating systems. In addition, when used, it displays a list of found systems that are not currently registered in the Windows boot configuration data store (Boot Configuration Data (BCD) )Store).
Bootrec.exe /RebuildBcd
Launched with this key, the utility scans all disks for the presence of installed Windows Vista or Windows 7 operating systems. Found operating systems are displayed in a list from which they can be added to the Windows boot configuration data store (Boot Configuration Data Store). Also use this option if you want to completely rebuild the boot configuration data store. Before doing this, you must delete the previous storage. The set of commands could be as follows:
Bcdedit /export C:\BCDcfg.bak attrib -s -h -r c:\boot\bcd del c:\boot\bcd bootrec /RebuildBcd
The example above exports the current boot configuration store to C:\BCDcfg.bak, removes its system, hidden, and read-only attributes, removes it with DEL, and rebuilds it with bootrec /RebuildBcd.

Enlarge picture
Of course the utility Bootrec.exe is very functional, however, it will not help if, for example, the Windows boot loader file bootmgr damaged or physically missing. In this case, you can use another utility, also included in the Windows 7 distribution media - bcdboot.exe.
Recovering the boot environment using BCDboot.exe
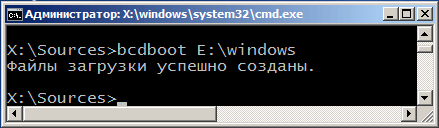
BCDboot.exe is a tool that is used to create or restore a boot environment located on the active system partition. The utility can also be used to transfer download files.
The command line in this case might look like this:
Bcdboot.exe e:\windows
Replace e:\windows with the path that matches your system.
This operation will repair the corrupted Windows boot environment, including the boot configuration data (BCD) store files, including the bootmgr file mentioned above.
Syntax of bcdboot command line parameters
The bcdboot.exe utility uses the following command line parameters:
BCDBOOT source ]
source
Specifies the location of the Windows directory used as the source when copying boot environment files.
Optional parameter. Sets the boot environment language. The default is English (US).
Optional parameter. Specifies the drive letter of the system partition where the boot environment files will be installed. By default, the system partition specified by the BIOS firmware is used.
Optional parameter. Enables detailed logging mode of the utility operation.
Optional parameter. Combines the parameters of the newly created and existing boot storage record and writes them to the new boot record. If an operating system boot loader GUID is specified, combines the boot loader object with the system template to create a boot entry.
Summary
The article discussed the principles of working with the bootrec.exe and bcdboot.exe utilities, which are used to resolve problems associated with the inability to start the Windows 7 operating system due to a damaged or missing bootloader.
Restoring the Windows 7 boot loader - performing steps to restore the operating system after problems occur when loading Windows. Due to a system failure, the user may lose data and personal files located on the computer.
At one point in time, the operating system will not be able to boot on the computer. Various messages (not always in Russian) appear on the screen, indicating a problem loading Windows.
The main causes of problems with the Windows 7 bootloader:
- user actions: attempt to use hidden system partitions, incorrect changes to boot files using EasyBCD, etc.;
- system failure;
- exposure to malicious software;
- the appearance of bad blocks on the computer’s hard drive;
- operating systems are installed on the computer in the wrong order;
- hardware problems.
The problem with the bootloader must be solved, otherwise you will not be able to use Windows, because the system will not start on the computer. Problems can be resolved in a radical way: again on the PC.
If there is one created by a system tool, or using third-party programs, you need to restore from a Windows backup image created in advance. Many users, unfortunately, do not pay enough attention to system backup, so these methods will not work for them.
How to restore Windows 7 bootloader? To restore operating system boot files, use the built-in Windows tools: automatic startup recovery, as well as using the BootRec and BCDboot utilities included in the operating system, launched on the command line.
Before using operating system tools, you need to know the hard drive layout. Modern computers have a GPT hard drive layout style and a new BIOS - UEFI, but in the days of Windows 7, MBR partitioning was used on disks, and now an outdated BIOS. On some computers, Windows 7 64-bit is installed on UEFI and GPT drives, and in general, Windows 7 PCs use MBR (Master Boot Record) partitioning.
In this article, we will look at instructions on how to restore the bootloader in Windows 7 using system tools: first, we will perform an automatic recovery, and then we will try to restore the bootloader from the command line.
To perform operations to restore the boot loader, you will need either an installation DVD with the operating system, or a bootable USB flash drive of Windows 7. Bootable media is needed to be able to load the Windows RE (Windows Recovery Environment) recovery environment on a personal computer, with which you can try to solve problem with the inability to start the system.
Perform Windows 7 recovery automatically using the system tool
The easiest way: automatic recovery of the boot partition on the hard drive using the operating system. This action occurs without user intervention; you only need to boot onto the computer from the boot disk.
Immediately after starting the computer, using the keyboard keys you need to enter the Boot Menu to select an external device to boot: a DVD drive or a USB flash drive. Which keys to press depends on the hardware manufacturer, check this in advance.
Another way: you can enter the BIOS and set the boot priority from the connected device there: a USB drive or a DVD drive.
In this example, I am using a Windows 7 installation disk; all actions from a bootable USB flash drive are performed in a similar way.
In the first window of the Windows Setup program, click on the “Next” button.
In the window asking you to start installing the operating system on your computer, in the lower left corner click on “System Restore”.

In the “System Recovery Options” window that opens, a search for installed systems will begin.
After a while, a message will appear stating that problems have been detected in the computer's boot settings.
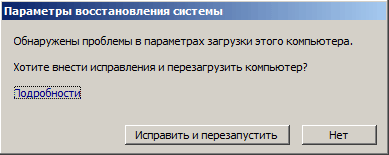
Click on "Details" to view a description of the fix.

To run automatic troubleshooting of system boot problems, click on the “Fix and restart” button.
After restoring the bootloader, the Windows 7 operating system will boot onto the computer again.
Automatic troubleshooting using system tools can be started a little differently:
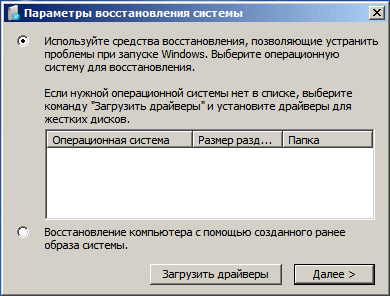
- In the System Recovery Options window, enable the option “Use recovery tools to help fix problems starting Windows. Select the operating system to restore" and then click on the "Next" button.
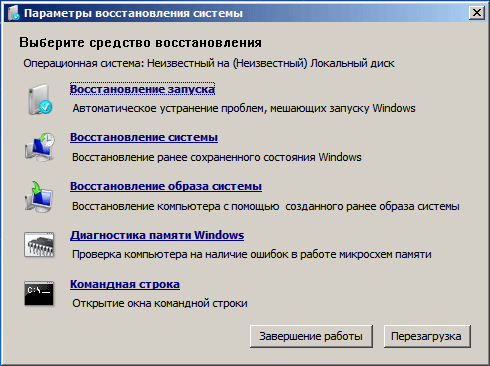
- In the window for selecting recovery tools, click on “Startup Recovery”.
- Wait for the operation to automatically resolve problems that are preventing the system from starting to complete.
If the problem is not automatically resolved, then move on to the following methods, in which the user will have to manually enter commands in the Windows Command Prompt.
Restoring the Windows 7 bootloader using the Bootrec utility
The next method involves restoring the Windows 7 boot loader via the command line. For this we use the Bootrec.exe utility. This method only works with disks that have a Master Boot Record (MBR).
From the boot disk you need to enter the Windows Recovery Environment using the method described above.
In the System Recovery Options window, click on the Command Prompt option.
The Bootrec.exe utility uses the following basic commands:
- FixMbr - The option writes the master boot record (MBR) to the system partition of the disk, compatible with Windows 7, does not overwrite the existing partition table
- FixBoot - using the command, a new boot sector that is compatible with Windows 7 is written to the system partition
- ScanOS - searches all drives of installed Windows 7 compatible systems, displaying entries that are not in the system configuration store
- RebuildBcd - searches all drives of installed Windows 7 compatible systems, selecting systems to add data to the boot configuration store
The FixMbr command is used to fix the master boot record, as well as to remove incorrect code from the master boot record.
The FixBoot command is used under the following conditions: the boot sector is damaged, the boot sector has been replaced with a non-standard boot sector, or an earlier version of Windows (Windows XP or Windows Vista) was installed on the Windows 7 computer.
The ScanOS command searches all drives for operating systems compatible with Windows 7. As a result, all entries related to other operating systems installed on the computer that do not appear in the boot manager menu will be displayed.
The RebuildBcd command allows you to detect and add boot configurations installed on the system computer to the storage. This option is used to completely rebuild the system boot storage configuration.
In the command line interpreter window, enter the command (after entering commands in the command line, press the “Enter” key):
Bootrec/fixmbr

If the problem persists, you may need to enter the following command:
Bootrec /fixboot
The remaining commands are used if multiple operating systems are installed on the computer.
Close the Command Prompt, and in the System Recovery Options window, click the Restart button.
How to restore the Windows 7 bootloader from the command line using the BCDboot utility
Using the bcdboot.exe utility, you can restore the Windows 7 bootloader on computers with MBR or GPT hard disk partition styles.
Boot from the removable device, go to the window with the choice of system recovery method, and then launch the command line. Another option: in the very first window, press the “Shift” + “F10” keys on your keyboard to enter the command line window.
In the Command Prompt window, enter the command to launch the DiskPart utility:
Diskpart
To display information about your computer's drives, enter the following command:
List volume
We need to find out the drive letter (volume name) on which the operating system is installed.
The volume name (drive letter) in Diskpart may be different from the drive letter in Explorer. For example, in my case, in Explorer the system partition has the letter “C”, and in diskpart it is designated by the letter “E”.

To exit the diskpart utility, enter:
Bcdboot X:\windows
In this command: “X” is the drive letter on which the operating system is installed. In my case, it is the letter "E", you may have a different volume (disk) name.
Close the command prompt.
In the System Recovery Options window, click the button to restart your computer.
Conclusions of the article
If you have problems with the Windows 7 boot loader, you need to restore the system boot files by booting your computer from a Windows boot disk. You can restore damaged or missing files using operating system tools: automatic troubleshooting of Windows boot problems, using the Bootrec and BCDboot utilities, launched from the command line in the recovery environment.
Experienced PC and Internet user
To save your computer from constant resets and restarts when booting, you need to restore the operating system (Windows) in the command line.
The Recovery Console contains most of the most commonly used system commands.
They allow you to fix the problem and get your computer working again in a matter of minutes.
First, you need to have an installation disk on hand or with the version of Windows that was installed on your PC.
Nowadays, USB drives are the most commonly used.
Using a special utility Rufus, we can create such a drive in a couple of clicks.
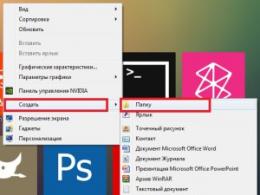
Like the picture below:
Our installation process will open, you need to wait until all the download files are unpacked.
After unpacking is completed, the following window will open.
Press the key in it R to open the console.
Now you need to enter the number that corresponds to the desired copy of Windows.
In most cases, only one OS is installed, click on the button 1 .
If you have a password set, you need to enter it and press Ok. Or just click Enter.
This will open the Recovery Console.
We can enter any command we are interested in in a text line.
A complete list of them can be obtained by writing
Help .
Fixmbr - this command will help restore the system boot partition.
To confirm any action, press the Latin letter Y and press Enter.
We write and confirm the command
Fixboot , to begin the process of burning the OS to the system disk.
After the process is completed, enter
Exit , to close an unnecessary console.
Then we restart the computer.
VIDEO: MBR recovery on Windows XP, all commands in the recovery console
Recovering MBR on Windows XP, all commands in the recovery console
Commands to restore Windows 7
We will restore our system through safe mode.
When the computer starts, press and hold the key F8 .
In rare cases, its function is taken over by a button Delete.
A boot menu will open in front of us, in which we need to select the item "Safe Mode with Command Line Support". As shown in the screenshot below:
A console will open in front of us in which we need to write the command
Rstrui.exe
It will open before us "System Restore Wizard"».
It displays a list of saved points to which we can roll back the system.
Among them there will be an automatically created point.
Select the item that interests us and click Further . The recovery process has started.
After this, reboot your .
This method works even when the system is heavily damaged by viruses. This method can be used if the OS does not load at all.
Interesting videos that will further help you understand the problem:
VIDEO: Windows won't boot? Reboot Windows 10, 8 or 7
Windows won't boot? Reboot Windows 10, 8 or 7
During startup, press the key Delete to enter the BIOS subsystem.
Finding the tab « boot» and install our media in first place.
This is done in order to boot the system from it.
While in the BIOS, remember which disk is located first in the “boot” tab. If you have two or more hard drives, the boot will start from the one that does not have operating system data. Put in first place the drive on which you want to install Windows.
Now press the key F10 and press the button Y in the Latin keyboard layout.
The BIOS configuration was successfully saved. After this a window will pop up "Installation Wizards"Windows8".
At the bottom of the screen we find the item "System Restore" and click on it.
From the list provided, select the desired operating system:
Now let's go to the section "Diagnostics" and enter:
Click on "Automatic recovery" and wait for the process to complete.
While in the BIOS, remember which disk is located first in the tab "boot". If you have two or more hard drives, the boot will start from the one that does not have operating system data. Place the drive you want to install on first.
Manually fixing problems
If the automatic mode is powerless, we proceed to manually eliminating bugs.
To do this, in the “ Additional parameters» select a tab "Command line".
Let's start working with the command line.
To begin, enter
Bootrec /FixMbr - to fix the boot record.
Then we write
Bootrec/FixBoot , to fix the new boot sector.
Then we enter
Bootrec/ScanOS . This command will help you find previously installed versions of Windows.
And the last -
Bootrec /RebuildBcd .
It is designed to provide information about installed OS versions in the download repository.
To complete, enter the Latin Y to confirm all our actions.
As a result, you should have a picture like this:
Now you just need to restart your computer for the changes to take effect.
If all previous actions were unsuccessful, then we will use another method.
We launch the console using the tools designed for this Win + X.
Finding the point "Command Prompt (Administrator)" and left-click either Enter.
After this, we create a directory for our copy of Windows.
To do this, enter in the required field:
Mkdir С:\Imagen-Restaurar and press the key Enter.
Your actions will not result in any visible changes. Don't be alarmed.
These are the system settings. The console will give you a response after the manipulation is completed.
Leave the computer quiet for 20-30 minutes without performing any additional actions.
When working with the console, never put spaces between words; it is better to replace them with — (hyphen). In cases with spaces, errors and unexpected failures may occur.
When the process is complete, you will see the copy you created, which will appear under the name "WITH:".
You can choose the recording path yourself. You will have two options: an external screw or another local drive.
"Imagen-Restaurar"- the name of the created folder in which our image will be stored.
So, after the process is completed, check for the presence of the file "CustomRefresh.wim".
If it is not detected, then click restart and try again.
If you specified the wrong path, you should look for the mounted image in the folder System32.
This is registered as a starting point for Windows system recovery.
WITHIt is worth creating a restore point when the operating system is in order. In the future, you can roll back the OS to the last restore point at any time.
Starting Windows 10 Recovery Mode
Reboot in Safe Mode
Before restoring, you need to make sure that there are no malicious files on the system. If a virus attack has damaged Windows, then it is worth conducting a deep scan of the entire computer.
First of all, we reboot our PC in safe mode. To do this, open the menu "Start".
Find the item and open it by clicking the left mouse button.
Now click on “Update and Security” → “Recovery” → “Special boot options”.
Finding the option "Reboot Now" and choose it.
As a result of this, it will open before you.
This item gives us three actions to choose from, select a position "Diagnostics".
In the window that opens, select , and finally
From the proposed list of reboot options, we need "Enable Safe Mode."
Click on the button "Reboot."
This mode can also be selected in a short way: go to "Start", hold down the key Shift and click on the action. The screenshot describes in detail:
The same function can be set by default via the command line.
First, open it (it’s shown above exactly how) and enter just one command:
bcdedit /set (default) bootmenupolicy legacy and press Enter.


If your computer does not boot into Windows when you turn on the computer, the process freezes on a black screen, then the hard disk boot record (MBR) may be damaged.
External manifestations
When an error appears on the screen, doubts disappear.
Other information about a malfunction of the HDD bootloader may also be displayed.
The text information may vary depending on the classification of the error. But when the word boot is mentioned, it is clear that there is a problem with loading.
You can find out how to restore the MBR on this page.
Causes
Pay attention to the common causes of HDD boot sector failures.
Two types of bootloader
Older systems prior to Windows XP used the NT Loader (NTLDR). In Windows 7, Vista and subsequent versions of the OS, UEFI and EFI began to be used. Therefore, old and new systems are usually not installed on the same PC. Otherwise, NTLDR overwrites UEFI.
Third party software
Errors in the HDD boot sector can occur when using even popular programs for the hard drive partition. This happened to me with Acronis. This happens because such software replaces disk boot drivers with its own. This can corrupt the original MBR entry. Therefore, it is better to use the built-in hard disk partitioning methods from Windows.
Viruses
Viruses sometimes wreak havoc on the MBR. Therefore, after restoring the HDD boot, check the computer with antivirus programs.
If you are sure that the cause is viruses, then clean your PC of them before repairing the MBR. To do this, there are utilities of well-known anti-virus companies, for example, Kaspersky Rescue Disk. They are provided free of charge on official websites with instructions for use.
Any of these programs is included in the software package for CD or DVD, which allows you to boot from a CD, find and remove viruses on the HDD.
Windows 7 Boot Recovery
Sector repair is performed from a CD or USB flash drive with the installation package of the operating system.
- First, insert the DVD into the drive or flash drive into the USB port with the Windows distribution.
- Then you need to allow startup from these devices. This is done in the BIOS settings.
Changing download sources
Technology of the following order:

Be sure to press F10 when exiting, otherwise the changes will not be saved!
Working from a CD or flash device
Proceed in the following order:
- After the reboot, the following message will appear at the bottom: “Press any key...”. This asks you to press any key. Click. It won't work out otherwise. If the inscription has already disappeared, repeat everything from the beginning. To do this, press three keys at once: Ctrl+Alt+Del. This will cause the computer to restart.
- When you boot from the DVD or flash drive, the Windows installation window will appear. At the bottom left, select “System Restore”.

- You will be prompted to connect network capabilities, select languages or a drive letter. Don't change anything and get to the choice of systems.
- Select the desired Windows and check the box next to “Use recovery tools...”.

- If the required system does not exist, it should appear when you click “Download drivers”.
- Continue with the “Next” button.
- In the next window, select “Startup recovery”, and the MBR can be reanimated automatically.

- If the sector does not work, then press “Command Line”.
- On the command line, call the Bootrec utility and write for it to repair the MBR: bootrec/fixmbr. You end each command with the Enter key.

- Then create a new boot sector: bootrec/ fixboot. To exit the program, type exit and remember to press Enter.
If the fixes didn't help
There is another MBR resuscitation team - bootsect /NT60 SYS. After that, try to boot again.
If the attempt fails, write on the command line like this: bootsect/rebuildbcd. A search will be performed for operating systems installed on the PC.
Now try logging into Windows again. Please note that there will now be one more system in the list. Try to enter each of them. It should work!
Non-standard way
If all sector recovery options do not help, it is recommended to reinstall Windows. And no matter how much you want to do it sometimes! Isn't it true?
I thought so too and decided to put another small system nearby. What does "small" mean? This is the boot system. It is empty: I did not install drivers or my programs on it, because I don’t work in it. But it does load!
I achieved what I needed: a working boot area appeared on the hard drive. Now I log into the old system normally. The downside is that I lost about 14 GB of disk space. If you are not afraid, you can use this method!
How to fix a sector in Windows 8-10 and Vista?
For Vista and later versions of Windows, the same methods are suitable as for the “seven”, only the design is different. For example, in the “eight” he is like this.
But the points remain the same. Therefore, we will not describe them. Use the instructions described above for Windows 7.
On Windows XP
In the "experiment" sector, the principle of resuscitation of the sector is similar. But the entrance is a little different. Now you will see it:
- After booting from the CD, system files are copied to the hard drive.
- Then the action selection window appears.

- You select the recovery option using the console, so press the R key.
- Next, they will ask you which system to log into. When she is alone, there is nothing to choose, but you need to answer. To do this, press the number “1” on the keyboard if it says: “1. C:\WINDOWS,” or click on another number next to the desired OS.
- Then a black DOS screen appears. This is the same command line, but for the entire monitor area. You are dialing fixboot and press Enter.
- You will be asked if you want to record a new boot sector.
- If you answer positively: write Y. Let me remind you that you press Enter after each entered command or your answer.
- Then a record of a successful operation appears if everything went correctly.