Windows shows less memory than installed. How to use all RAM in Windows: the most common situations and solutions Installed RAM is less than available
Updated: 01/01/2020 Published: 06/15/2018
Description
The system detects less RAM than is installed in the computer.
Or not all memory is available to the system:
Also, the BIOS may not detect its entire volume (more often than not, only half).
Cause
- Part of the memory is taken by the video card.
- The edition or bit limit of the operating system.
- Software limitation.
- Memory reservation by the system.
- RAM malfunction.
- Processor-side limitation.
- BIOS error or need to update it.
- The maximum volume limit that the motherboard supports.
- The motherboard does not support one of the memory modules.
Solution
1. Using the built-in video card
This problem is characterized by insignificant memory allocation for the video adapter. In this case, we will observe a slight decrease in available memory, for example:
Any video card integrated into the motherboard consumes system memory, since it does not have its own resources.
To understand which video card is used, you can go to the device manager (command devmgmt.msc) and expand the section Video adapters:
Typically, NVIDIA and AMD adapters are discrete (not integrated), while Intel adapters are integrated.
If we want the built-in video card to consume less memory, go to the BIOS/UEFI and find one of the parameters:
- Share Memory Size
- Onboard VGA Frame Buffer
- Display Cache Window Size
- On-Chip Video Window Size
- Onboard Video Memory Size
- Internal Graphic Mode Select
- Integrated Graphics Share Memory
* in different BIOS versions they may be called differently. It is also possible that other parameters may be used - in this case, you need to study the documentation for the motherboard or use a search engine.
Then we change the amount of memory reservation for the required video systems:
2. Software limitation
The restriction can be set in the system. To remove it, open the command line and enter the command msconfig- the “System Configuration” window will open (you can also use the Windows search by the window name).
In the window that opens, go to the tab and click on Extra options:
Check that the checkbox is not checked Maximum memory or not worth a value less than the volume. Otherwise, just uncheck the box:
3. Operating system limits
Different editions of the Windows system have limitations on the maximum amount of memory used.
a) All 32-bit versions can use a maximum of 3.25 GB of RAM. This architectural limitation is the limit of what a 32-bit system is capable of. The picture will be something like this:
To use more than 3 GB of memory, you need to reinstall the system to the 64-bit version.
b) Windows editions also have limitations. For example, Windows 10 Home 64 bit will allow you to use 128 GB, and Windows 10 Pro x64 will allow you to use 512 GB. With Windows 7 the situation is worse - the home basic edition will allow you to use only 8 GB, and the initial edition only 2 GB.
More details in the tables:
| OS | Limit, GB | |
|---|---|---|
| 32-bit | 64-bit | |
| Windows 10 Home | 4 | 128 |
| Windows 10 Pro | 4 | 512 |
| Windows 8 | 4 | 128 |
| Windows 8 Enterprise | 2 | 512 |
| Windows 8 Professional | 4 | 512 |
| Windows 7 Starter | 2 | 2 |
| Windows 7 Home Basic | 4 | 8 |
| Windows 7 Home Premium | 4 | 16 |
| Windows 7 Professional | 4 | 192 |
| Windows 7 Enterprise | 4 | 192 |
| Windows 7 Ultimate | 4 | 192 |
If our problem is related to the edition limit, we need to update the system or reinstall it.
4. Setting up the basic I/O system
In order for the computer to use all the memory, in some cases, BIOS/UEFI settings may be required:
5. Checking the fastening of modules or rearranging memory sticks
The memory stick may not be connected to the slot on the motherboard tightly enough, which is why it will not be used by the computer. In this case, we will observe a shortage of a large amount of memory (per module). We try to insert it more tightly into the connector. When installed correctly, the module should make a clicking sound.
Sometimes, swapping memory modules helps. We simply disassemble the computer, take out the modules and swap them.
In some cases, the slot on the motherboard may be faulty. If there are free connectors, you can try to use them. It is necessary to use slots of the same color.
6. Maximum volume that the motherboard supports
It is necessary to check what is the maximum volume that the motherboard itself can see. To do this, you should use the instructions - it is included in the kit, and you can also download it from the manufacturer’s website. Also, similar information can be found on some online stores:
Some equipment (usually already outdated), in principle, does not support large amounts of memory. For example, the ASUS K50 laptop according to the specification supports 4 GB, however, official technical support states that it will only see 3 GB.
7. Problem with BIOS/UEFI
Since BIOS/UEFI is responsible for collecting information about the computer, the problem may occur at the initial stage of turning on the PC.
First, let's try resetting the settings. To do this, disconnect the computer from the power source and remove the battery for 20 minutes (you can try for the first time, 10 seconds). If this does not help, update the BIOS.
8. Memory module malfunction
In the event of a memory failure, the system and BIOS will not display its entire volume (usually only half). For example, if 16 GB are inserted into the computer (2 8 GB sticks), we will only see 8.
In this case, you can try to remove and reinsert the memory sticks (you can blow some dust out of them). Also, the slats can be swapped. You can also try cleaning the contacts (a regular eraser will do). Some laptops or all-in-one computers have a separate cover, by opening which you can get to the memory modules, otherwise you need to completely disassemble the computer.
If this does not help, run a memory test. In the case when the test also shows part of the memory, we try to pull out both sticks and insert them one at a time - if the computer does not turn on with one of them, this faulty stick needs to be replaced, if the computer starts with all the sticks, perhaps we are dealing with a problem BIOS (step below).
9. Discrete graphics card
It was already indicated above that the built-in video card takes up part of the memory for its work. A discrete card, in some cases, can also take up system memory as so-called “swap memory”. This happens at a time when it does not have enough of its own memory (most often, after overclocking or launching demanding games/applications).
To solve the problem, try the following:
- If the card has been overclocked, we return the old parameters.
- Reinstall the video card driver.
Also, some laptops may use two video cards - built-in and discrete. If the application is not demanding on the graphics adapter, then the laptop will run on the built-in video card, taking up memory resources. Alternatively, in the BIOS settings you can enable priority for using a discrete video card.
10. Processor limitations
Each processor has its own limit on supporting the maximum amount of RAM. You need to go to the official website of the developer and check what maximum volume our processor supports.
11. Module support from motherboard side
If you purchased additional memory and it is different from the second stick, you need to make sure that the motherboard supports the new module.
This can be done on the official website of the motherboard manufacturer - go to the support section and find the compatibility sheet. Among the list of equipment, you need to find the purchased memory.
12. Cleaning modules with an eraser
If the problem appears on its own, you can try to remove the memory modules from the motherboard and clean their contacts with an eraser. Afterwards we blow out the connectors on the motherboard and insert the memory into place.
13. Installing the driver for the chipset
Updating or reinstalling the driver may also help resolve the issue. To do this, we determine the manufacturer and model of the motherboard, go to the manufacturer’s website, find the page for the specific model and download the driver for the chipset. Install the downloaded driver and restart the computer.
Also, the driver can be installed semi-automatically using the DriverHub program.
14. Adjusting timings
If the computer is equipped with sticks with different timings, the memory controller automatically adjusts the necessary parameters, usually focusing on the indicators of the slowest one. But it happens that the controller cannot select the optimal settings. This leads to the fact that one of the modules does not work correctly and its memory capacity is not used.
To set timings, go to BIOS/UEFI and find the memory settings option. Depending on the type of firmware, its version and manufacturer, these settings may vary greatly. You need to find instructions for the BIOS/UEFI version you are using to change the timing parameters and set those that correspond to the slowest memory module.
15. Disable virtualization
In some cases, enabled virtualization technology may have an impact on maximum memory support. To check this option, we try to disable it.
Disabling virtualization support occurs in the BIOS in a section with a name similar to CPU or CPU Configuration. This section is usually located in the subsection Advanced. Depending on the processor used, the virtualization support option is called differently:
- for Intel processors we translate the option Intel Virtualization Technology(or Intel VT) to position Disabled.
- for AMD processors we translate the option SVM Mode to position Disabled.
Save the settings and check the memory capacity.
16. Windows license limitation
The systems that come with computers use a strict licensing policy that limits the replacement of equipment. This can lead to a situation where, when adding memory, all of it will not be recognized.
In this case, you need to reinstall the system. In this case, a simple reinstallation over the existing system will not help - only a complete formatting of the system partition with the installation of a new Windows.
The other day, my friend asked for help figuring out his problem: Windows 7 on his Samsung R525 laptop reported that it saw 3 GB of installed memory, but only 764 megabytes were available. The laptop, of course, worked slower than we would like. You can check how much memory Windows sees by right-clicking on “My Computer” and selecting “Properties”. The picture will be something like this (the screenshot shows what was achieved as a result of solving the problem):
A search for the phrases “3 GB installed, 1 GB available” and “Windows shows more memory installed than available” showed that the problem is widely known, but can be caused by many reasons.
What was checked first:
2 DIMM PC-133 are installed, one is 1 GB, the second is 2 GB BIOS sees all these 3 GB, the system sees them too;
Rearranging DIMMs does not change anything;
Our Windows 7 is 64-bit, so it should definitely see more than 3 GB of memory;
Windows 7 Home Basic supports up to 8 GB of memory, so there shouldn’t be any problems depending on the system version;
the “Resource Monitor” program (click the “Start” button and in the “Search programs and files” line just write - Resource Monitor”)* says that more than 2 GB is reserved for some devices;
in the msconfig.exe program on the Boot->Advanced tab, the “Maximum memory” checkbox is NOT checked; This is how it should be - to use the maximum amount of memory, the checkbox must be unchecked.

The problem could lie in the video card driver settings. The fact is that modern video cards often either do not have their own memory at all, using the system memory for their own purposes, or have a minimum of memory on board, and to display images with high resolution or with a large number of colors, they also use the system memory. The laptop's BIOS allowed "biting off" no more than 512 MB of system memory, so reserving an additional 1.5 GB could be attributed to the driver.
In this model, Samsung uses an ATI Radeon 4250 video card integrated with the motherboard. I had to download a new driver for this video card, but installing it did not help: the driver for this video card does not have settings indicating how much system memory the driver can “eat up”. In principle, some video cards are able to share memory with the system, marking it as reserved, and the resource monitor understands this, displaying such memory as a gray bar. An example display is shown in the figure below, but for a different system, just to give you an idea of what it looks like.

The system can use the memory shared between the video card and the system until the video card needs it, and as soon as the video card requests it, the system will be forced to release it. However, the amount of such shared memory, even if it exists, is usually limited to no more than half of the available memory, more often - noticeably less.
Thus, our case was out of the ordinary. Then additional research was undertaken: instead of the old memory modules, a new 4 GB module was inserted into the laptop. The amount of available memory has increased to 2.75 GB. This already looked like an automatic “biting off” of memory by the video card (exactly about 1.25 GB should have been reserved, a number of sources on the Internet spoke about the formula used “half the system memory minus 512 GB, which for us for 4 GB of system memory gave would be 1.5 GB).
Suspicion fell on one of the DIMMs. And it’s true: when I tried to boot with only one old module of 2 GB in size, the laptop refused to boot. It turned out that the SPD chip on it, which tells the system the configuration of the module, was alive, and the memory itself was faulty, and therefore Windows excluded it from operation.
After replacing the faulty 2 GB module with a new 4 GB module, the system returned to normal, and the picture of the memory properties became as shown in the figure at the beginning of this article.
Note to the owner: what Windows shows as “installed memory” does not always reflect the amount of working memory. If there is a noticeable difference (more than 40%) between the installed and available memory, check the boot settings using msconfig, and also monitor the health of the memory modules. In addition, it is better not to buy such video cards or laptops with integrated video cards that voraciously consume system memory.
Increasing the range of RAM is one of the easiest methods to improve PC performance. However, many users often encounter the following problem: after adding memory, the operating system reports that it is not available to it. For example, after increasing the volume to 8 GB, Windows sees only 4 GB. Such problems can be caused by hardware or software reasons.
Uses a 32-bit operating system
When using Windows 7, 8, XP, Vista on the 32-bit version, maximum amount RAM that they are able to recognize. 32-bit versions are very limited in terms of recognition capacity. For this reason, users using larger amounts of RAM should use the 64-bit version, otherwise they won't be able to use it in full.
In order to find out your operating system version you need to go to control Panel and select " System" In the column " Installed memory"The size of the installed RAM is displayed, and in brackets it is indicated which part of it can be used. The number of bits of the operating system is displayed next to it.
The Windows version does not support this amount of memory
The operating system may not recognize all RAM due to version limitations. Each edition of Windows has its own limitations, for example:
- 7 starter– 2 GB;
- 7 home basic– 8 GB (including for the 64-bit version).
A complete list of Windows editions that have the corresponding restrictions can be found on the Microsoft website.
If such a problem occurs with a 64-bit Windows 10 system, you can fix the situation by resetting BIOS settings.
Memory reserved by video card or other hardware
A common scenario is when part of the RAM reserved for his work other equipment. Most often it is used by the built-in video card. In order to check how much RAM other equipment is using, you need to go to the “ System" If the memory is actually reserved by other devices, the corresponding column will show 2 values: the installed volume and the volume available for use, which is displayed in brackets. The difference between these indicators shows the amount that other devices take.
This option is possible if a video adapter is installed on the PC that does not have its own video memory. In this case, the system automatically allocates RAM to it at the BIOS level. It can also often reserve network adapter.
The motherboard does not support this amount of RAM
The motherboard may also have a limitation on the computer memory installed in it. This manifests itself in the fact that after successful installation of modules and startup, the board cannot use its entire capacity.
In order to make sure that this is the reason, you need to enter the BIOS and read information about supported volume, which will appear on the first screen. In order to prevent such a situation, you should carefully study the specification of the motherboard before installing it. 
RAM sticks are installed incorrectly
If the motherboard supports the entire amount of RAM, but it is not displayed in the BIOS, then the reason may lie in its incorrect installation. It is possible that the contacts are poorly connected to each other. This problem can be solved very simply: just remove the board and rewire it, or swap the slots or shuffle the strips.
RAM damage
The most difficult problem is damage to the RAM stick itself. It can be damaged in during operation or installation; in addition, there may be a manufacturing defect. To verify the damage, you should test all strips alternately to one port. After each shift, you should turn off the computer and check in the BIOS whether the computer sees this bar. In addition, you can check each strip separately or all together at another computer. To get out of this situation, repair or replacement of the device is necessary. 
People often ask the question: why is it that out of four (six or eight) gigabytes of RAM installed in a computer, only 2.23 (3.25 or 2.87, etc.) are available? The following are possible reasons for incomplete RAM detection.
Why does the computer not see part of the RAM?
1. A 32-bit operating system is installed.
Any 32-bit OS will “see” no more than 4 GB of RAM. More often - from 3.15 to 3.5 GB. And here it’s not so important whether it’s XP or “eight”. This happens due to the specific distribution of the memory address space. Accordingly, in order to avoid getting into such a situation, you need use 64-bit Windows OS.
2. The computer uses an integrated video adapter
An integrated (or “built-in”) video card can “cut off” part of the RAM for its own needs. This is very common in laptops. This situation is normal. And if the amount of remaining RAM is not enough for you, there is only one piece of advice: increase its volume by adding or replacing modules.
It is also important to understand here that:
- different integrated video adapters take up different amounts of RAM;
- the same video card is capable of taking up different amounts of memory, depending on the amount of RAM installed in the computer. Let's say when there was 2 GB of RAM, the video card took 512 MB. And when they installed 4GB, the graphics began to cut off 1GB.
- There are hybrid video adapters that have their own memory, but are also capable of expanding it by borrowing memory from RAM.
Because of these two reasons, it can sometimes be quite difficult to understand why a particular amount of RAM is available. After all, it may turn out that out of 6 installed gigabytes, 32-bit Windows “saw” 3.25 GB, and the video card “cut off” another 512 MB from this volume. As a result, in the system properties it will be written 6GB (2.73 available). The solution to such a combined problem will again be replacing the operating system with a 64-bit one and, if necessary, increasing RAM.
3. OS edition restrictions on the maximum amount of RAM
Younger editions of Windows 7 and Vista have limitations on RAM usage. For example, Windows 7 Starter only works with 2 GB of RAM, Home Basic x64 with 8 GB, and Home Extended x64 with 16 GB. Naturally, in this case, the only solution would be to install another edition of the operating system (for example, Pro).
4. Some memory modules are faulty or there is no contact
Turn off your computer. Unplug the power cord from your desktop PC or remove the battery from your laptop. Press the power button several times to remove the charge from the capacitors.
Remove all memory modules, clean their contacts with an eraser, then clean them with alcohol. Place the strips in place and check that they are all detected by the system. This can be conveniently done in the free CPU-Z program. Go to the SPD tab. On the left side of the window there is a drop-down list that displays information about the installed RAM sticks in each slot:

If empty fields are displayed when selecting a certain slot, it means that either there is no module in it, or it does not work.
5. Modules are installed incorrectly
In some motherboard models, some slots may not work until the priority slots are occupied. Therefore, such nuances should be clarified in the manual for the motherboard (on the manufacturer’s website or in the brochure).
6. RAM module compatibility problem
Check the operation of the strips individually using Memtest86+ ().
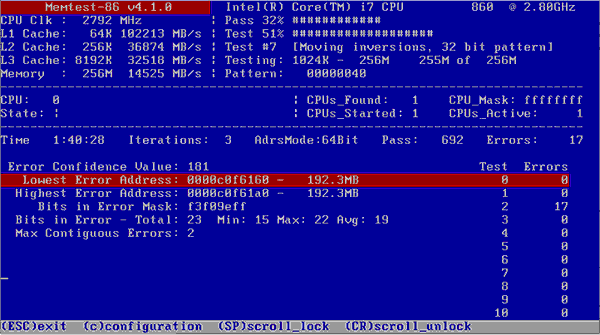
If each module independently works correctly (it is detected in the system, its volume is displayed correctly, there are no errors in tests), and when several are installed together one is not detected, then there is a problem with the compatibility of the strips with each other. To avoid this, try to install absolutely identical modules ().
conclusions
Once again about the most important things. In order for the operating system to use the RAM to the maximum, it is recommended to install 64-bit Windows editions such as Professional. When it comes to modern operating systems (Windows 7, 8.1 and 10), there are no problems installing the 64-bit version. And if you have a choice, feel free to choose this option.
But XP x86 and XP x64 are actually different systems with different kernel versions. And Windows XP 64 bit edition is considered quite unstable. Therefore, it is recommended to either install Windows 7/8.1/10 (if the computer is designed to work with one of them), or leave XP 32 bit.
Anyone can face the problem of having all their RAM available. At one point, when you decide to add one or more sticks of RAM to your computer, the following situation occurs. In the system properties it says that 4GB is installed, but only 2GB is available. Or instead of 8GB, 4GB is available.
In this article we will tell you how to fix this problem and force Windows to use all RAM.
How to make all installed RAM available?
The first step is to decide on a couple of things. First - . If you have 32 (x86) bit Windows, then it will not see more than 3.2 GB of RAM! The only option in this case is to install a 64-bit OS.
Also, if used, it will consume some amount of your RAM. Usually no more than 700MB. This can only be corrected by installing a discrete (stand-alone) video card with its own video memory.
If you have 64-bit Windows and a discrete video card, but not all the RAM is available, then you need to do the following.
To begin, open the system unit, remove all RAM modules and wipe the contacts on them with an alcohol wipe/simple eraser and install them back, preferably swapping places. This helps many people.
One possible reason is poor RAM contact
The next step is to enable the function in the BIOS settings. It is usually located in the Advanced -> North Bridge Configuration section.

Enabling the Memory Remap Feature in the BIOS
You also need to go to the system configurator by pressing the “Windows” + “R” buttons on the keyboard and entering the “msconfig” command in the window that opens.

The combination of the “Win” + “R” buttons on the keyboard

Open the system configurator with the msconfig command
In the window that opens, go to the “Download” -> “Advanced options” tab.

